![]() Before I begin extolling the virtues of KeePass, allow me to explain why I think a password manager is worthwhile. After I wrote the previous article, an irate reader seemed hell-bent on pounding into my head that ALL my ideas were dumb and that people only need pencil and paper to manage all financial account information. Give me a break.
Before I begin extolling the virtues of KeePass, allow me to explain why I think a password manager is worthwhile. After I wrote the previous article, an irate reader seemed hell-bent on pounding into my head that ALL my ideas were dumb and that people only need pencil and paper to manage all financial account information. Give me a break.
Sure, pencil and paper is fine if you only have one bank account, one credit card, and one investment account, but once you expand much beyond this basic foundation, the information that you must remember becomes increasingly unwieldy. Also, there’s also a great risk of losing the paper, forgetting to update it, or destruction by flood, fire, or rabid gophers. 
I can only speak based on personal experience, but between my wife and myself, I manage about ten bank accounts, at least a dozen credit cards, two retirement accounts, and a multitude of other random accounts (utilities, affiliates, e-mail, shopping, etc). That is A LOT of information, and don’t like to use the same username/password combination twice. While I consider myself a competently-intelligent fellow, I welcome the assistance of a password manager in recalling all of the usernames, passwords, and security questions.
Why KeePass Rocks
Since I started using KeePass a couple months ago, I’ve fallen headfirst in love with it. First of all, KeePass is completely open-source and FREE. It’s easy to use. It’s secure. It’s portable. Best of all, you can use it interchangeably on Windows, Mac OS X, and Linux. Heck, you can even use it on your Blackberry or Windows Mobile device!
Over the past few weeks I have been migrating my doubly-encrypted master password document over to KeePass, and I am enjoying the added convenience and versatility that it has given me.
Basic Setup
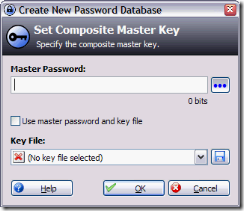 To start using KeePass, you must first create a new database in which to store your entries. From the File menu, click New, and a New Password Database window will spawn.
At this point, you need to set a Master Password that will allow you to gain access to ALL your other passwords. It is truly one password to rule them all, and in the database bind them!
Needless to say, create a strong password using numbers, capital letters, and special characters. Don’t use something dumb, like the word ketchup.
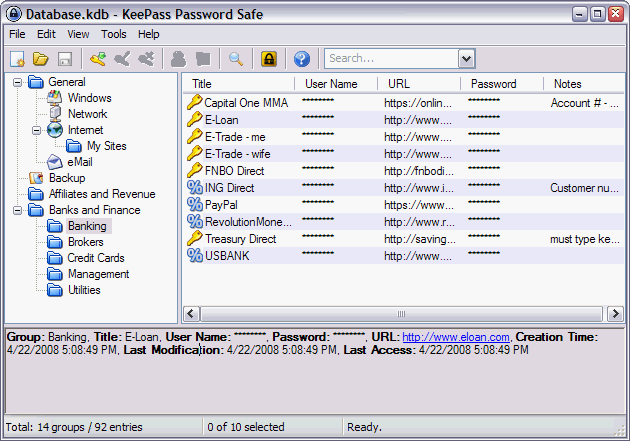
Once you have set your master password, it’s time to add some entries. The main interface of KeePass separates passwords Groups on the left and Entries on the right. Here’s a screenshot from my computer:
By right-clicking on either side, you can create groups (or sub-groups) and entries. For instance, let’s add a sample entry. Right-click in the space on the right and choose Add Entry… A new window will spawn like the one shown here.
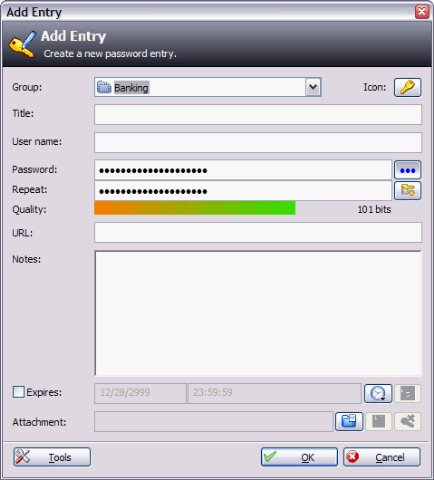
Fill in the necessary information, including the password (press Shift + Home to clear the password field), and then press OK when done. Congratulations, you now have a new entry. But what can we DO with it? This is the exciting part.
Basic KeePass Usage
The features of KeePass are what make it infinitesimally cooler than a piece of paper or a text document. Here are some examples.
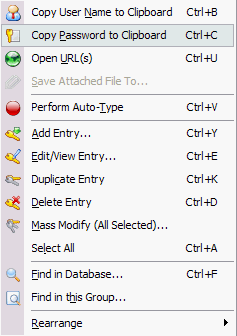 Right-click on the entry that you created and feast your eyes on the possibilities. With a simple keystroke, you can open the URL that you provided. Don’t feel like typing the password when logging into an online banking session? No problem. With another keystroke, KeePass will temporarily copy your password to the clipboard, allowing you to paste it into the appropriate web site. Worried that someone will come along behind you and try to paste again to discover your password? Have no fear, KeePass securely shreds that information immediately after the first paste. Cool!
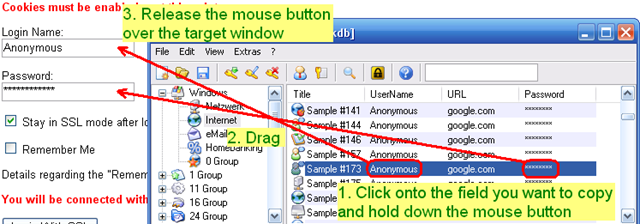
Don’t like keystrokes? No problem! KeePass features excellent drag-and-drop support. From the main interface, you can simply click-and-drag the username and password fields to the appropriate place on the website, and KeePass will fill them in appropriately! Here is a screenshot, courtesy of keepass.info.
You can even drag the URL field to your browser window and it will automatically open the appropriate URL. Neat!
The drag-and-drop options (plus the keystroke ability) provide added security against keyloggers. I’ll be spending several weeks in Europe this summer and I have an inherent distrust of public Internet cafes. Who knows if someone has surreptitiously installed some software to record every keystroke pressed on the keyboard? To work around this potential problem, I’ll just run KeePass from a USB flash drive at all Internet cafes, leaving no trace behind me. Call me paranoid, but I’ve been a victim of identify theft before, and I don’t ever want to go through that again.
Oh yeah, one more thing: KeePass also includes a password generator. I’ve started using it to generate passwords for certain sites that I do not trust very much (such as eBay).
Storing the Database
Since the database KeePass uses to store your account information is completely encrypted, you can simply e-mail the file to yourself for safekeeping. I keep the database stored on my personal computer, plus in a couple different places online. A bomb could fall on my house while I’m away and I would still have all my critical account information!
For added security, you can stuff the database file into an archive using software such as Winrar, 7-zip, or IZArc.
As long as you remember to keep a backup of your database file after you make any changes, you will always have the latest version of your passwords. Oh, and for those of you who feel more secure with paper copies, KeePass has the ability to easily print a list of ALL your account information by choosing Print from the File menu.
I want to re-iterate that my purpose in writing an article like this is to make people consider how their financial information is stored, and how easy or difficult it would be for other family members to access that information should tragedy strike. KeePass works well for me, but even if you do not care for it, I encourage you to find an option that does.